

Overview
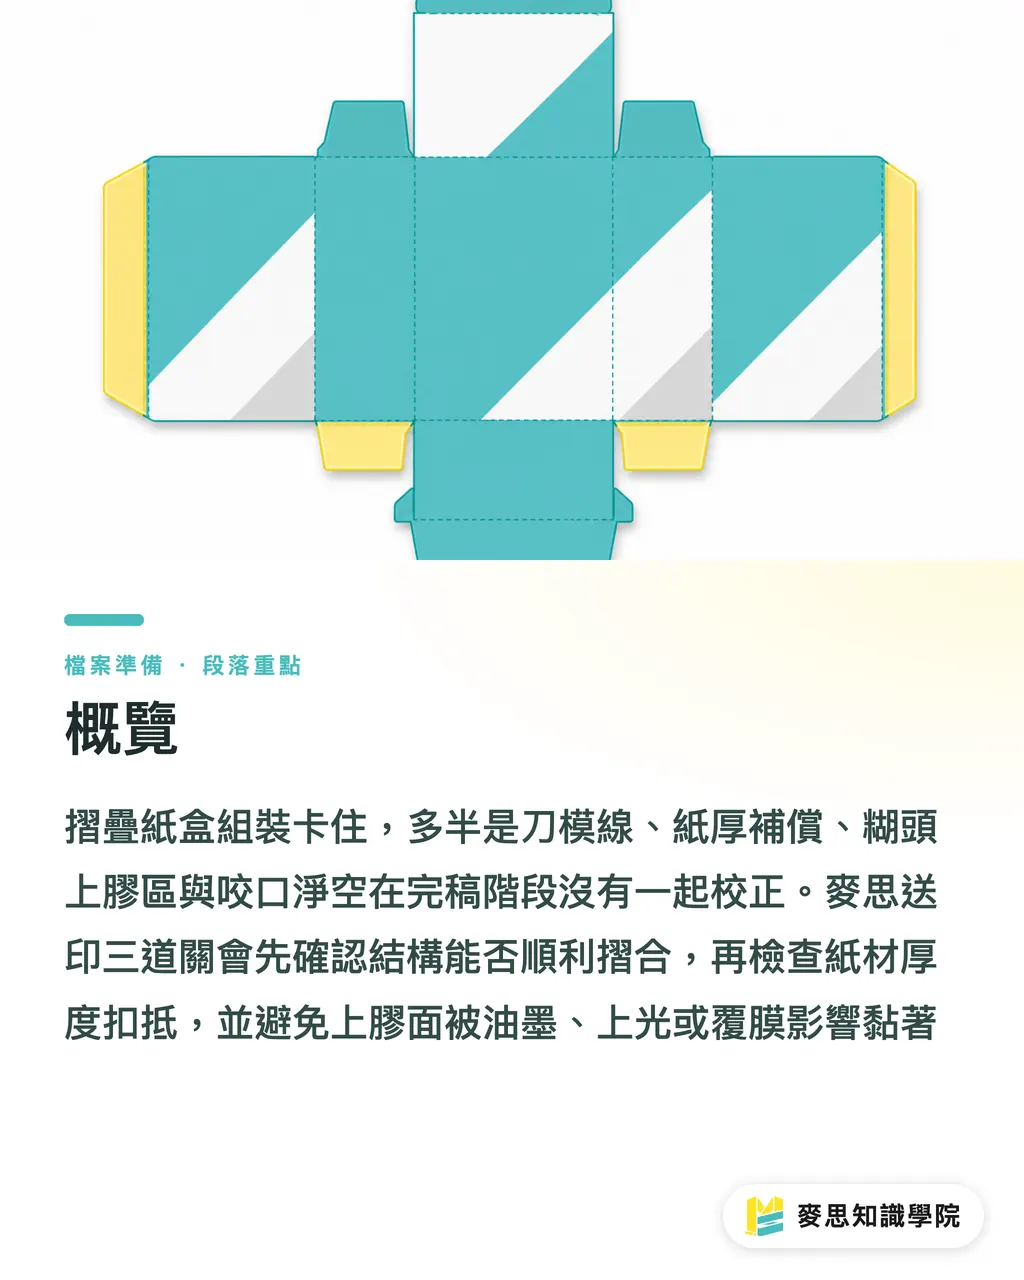
Folding carton assembly jams usually happen because dieline labels, paper thickness deductions, glue flap clearance, and gripper margins were not handled together during file prep. At MINDS (MS, mid-to-high-end fully customized commercial printing), our three-step pre-press check first verifies if the structure actually folds, then calculates paper thickness compensation, and finally checks if glue surfaces are blocked by ink, varnish, or lamination
Why Do Folding Cartons Jam During Assembly?
On the floor, carton jams usually come down to three main issues: corners catching on each other, tuck flaps refusing to slot in, or glue flaps failing to hold. While these look like finishing problems, most of them were planted right back during dieline file prep
Hold on a second
Brand packaging buyers often mistake carton style dimensions for outer dimensions, while designers tend to treat dielines as simple 2D layout boxes. A box isn't finished the moment it's cut out. It goes through scoring, folding, forming, and gluing. Every fold adds another layer of thickness, and every glued flap creates another stress point
Take a standard straight tuck-end box with a side glue flap. If that glue flap has ink, spot varnish, matte film, or UV coating printed over it, the glue hits a slick surface instead of raw paper fibers. The box might look fine right after gluing, but it pops open later in the warehouse, during transit, or on retail shelves. That kind of rejection is the absolute worst to resolve, because the defect is already buried inside finished stock batches
For mid-to-high-end custom commercial packaging, I recommend letting MINDS review your dieline and finishing paths before prototyping. For small runs of standard specs or retail jobs, check item specs on MINDS first to confirm size, stock, and finishing limits so you don't waste time prototyping blindly
How Should Solid and Dashed Dielines Be Labeled?
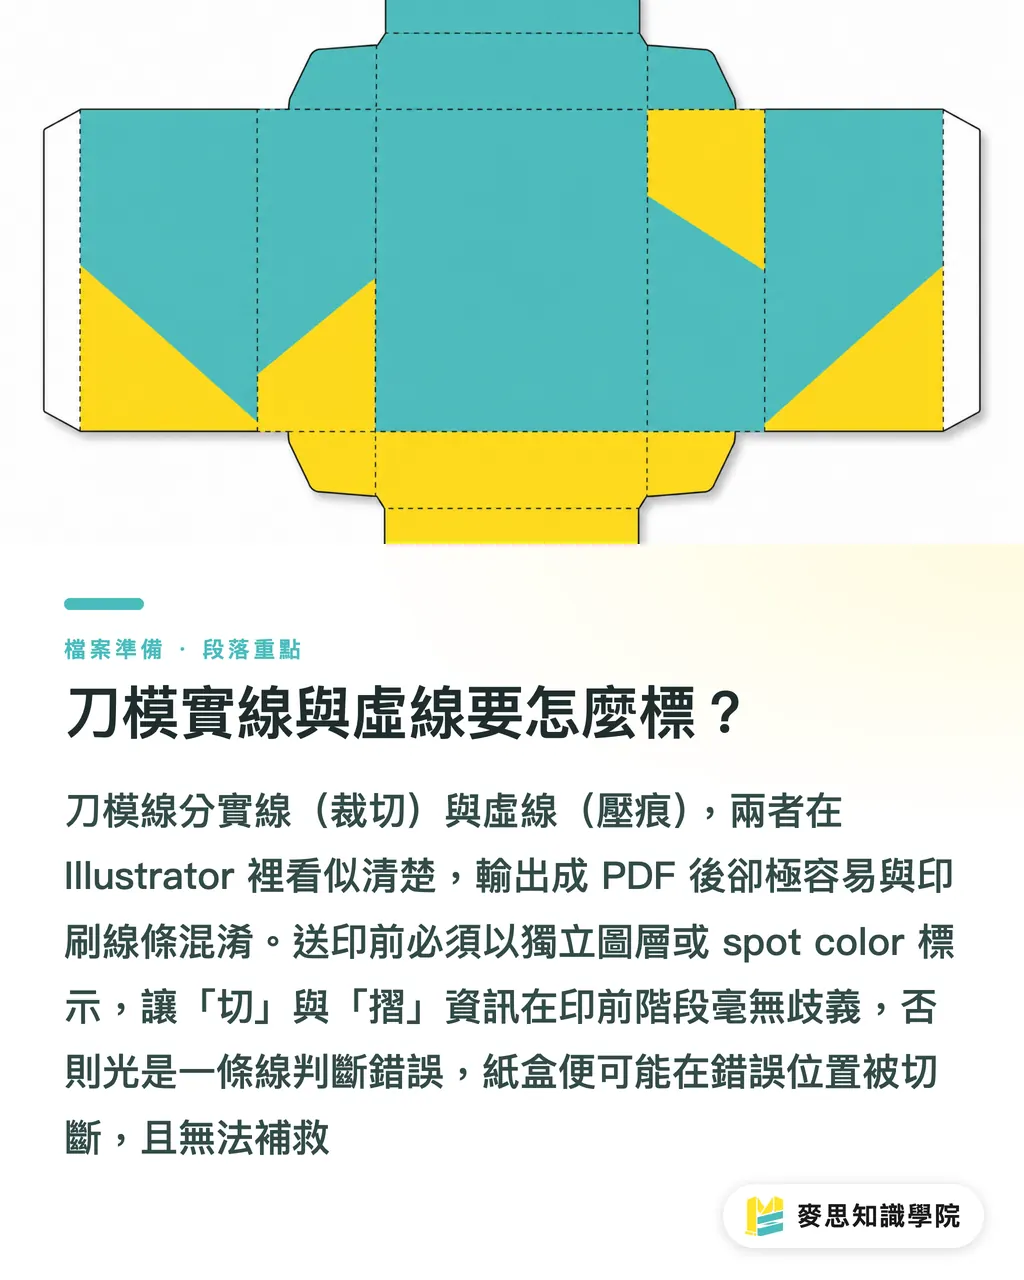
Dielines are non-printing structural lines used to form the box. They fall into at least two categories: cut lines and score lines. Cut lines dictate the outer shape, while score lines set fold positions and box angles
Among the file errors I've seen, burying dielines inside the CMYK artwork is the most common oversight. A designer might see everything clearly in Illustrator, but once exported to PDF, pre-press staff just see a mess of hairline rules, full-bleed art, spot varnish plates, and bleed lines all thrown together
At minimum, your print files need clean separation between structural lines:
・Solid lines: Cut lines that mark where blades physically slice the paper. They define outer outlines, tuck flaps, openings, and glue flap boundaries
・Dashed lines: Score lines or fold lines indicating where paper gets creased without breaking. They determine corner folds and assembly sequence
・Bleed: Artwork must extend past cut lines to prevent white edges after die-cutting. Keep bleed on a separate layer from dielines
・Non-printing structural lines: Dielines must be set as spot colors or kept on separate layers so they don't print as real color blocks or lines
I've seen jobs where a single mislabeled line caused a score to be misread as a cut. Once paper is sliced through, there's no fixing it. That's not a question of how skilled the finishing crew is, but a failure to state clearly in the file what gets cut and what gets folded
How Do You Actually Calculate Paper Thickness Deductions?
Paper thickness deduction means subtracting or adding paper thickness in your dieline dimensions ahead of time. This keeps fold corners, glue flaps, and tuck flaps from jamming against each other when folded, and it's usually calculated using caliper measurements in mm
Paper weight measures mass per square meter in gsm; paper thickness is actual caliper, usually in mm. Do not mix up these two numbers. A 350gsm SBS board, duplex board, and mounted paperboard will differ in thickness, spring-back, and space occupied when folded
Before setting up thickness deductions, ask one basic question: are you prioritizing inner or outer dimensions? Food, skincare, and electronics boxes usually require strict inner dimensions, because if the contents don't fit, the box fails instantly. Display boxes or outer packaging often prioritize outer dimensions so shelf specs and visual proportions stay exact
Here is a simplified example to make it clear. Suppose measured paper thickness is 0.45mm. A fold corner brings 2 layers of paper together. If your file draws adjacent panels flush against each other, the assembled box will lose about 0.9mm of clearance. 0.9mm looks tiny on a 2D screen, but in automated cartoning or fast manual assembly, it's enough to scrape tuck flaps, bulge the box body, or skew the closure
In practice, here is how I approach it:
・Fixed product size: Protect inner dimensions first, then add outer tolerance based on paper thickness and layer count
・Outer dimensions capped by retail specs: Protect outer dimensions first, then double check if contents, inserts, and tuck flaps need scaling
・Glue flap or tuck flap too tight: Check thickness deductions and score line positions first instead of just hacking the flap length shorter
・Using heavy stock or mounted board: Don't rely on gsm alone. Have your printer measure actual paper samples with a caliper before finalizing dielines
That's the core of it. A dieline isn't just about drawing a neat flat net. It has to make room for paper thickness once folded
Why Must Glue Flaps and Gripper Margins Stay Free of Ink and Coatings?
Glue flap clearance means keeping glue areas and gripper bonding surfaces completely free of ink, varnish, and lamination so adhesive can grab raw paper fibers directly, lowering the risk of popping glue or mold
The glue flap is that side strip on a carton that turns a flat net into a 3D box. If you print background color over the glue flap, it might look visually complete, but glue ends up trying to bond over ink or varnish, leading to unreliable adhesion
Check gripper margins at the same time. Depending on the process, grippers handle paper feeding, registration, bonding, or mechanical clamping. Treating them as ordinary artwork areas during file prep means ink, varnish, film, or spot treatments can interfere with downstream box forming
What scares me most on the production floor isn't a box popping open right away, but a box that looks fine for now. Once cartons hit the warehouse and face humidity, stacking pressure, or transport vibration, glue flaps start peeling. By the time the client notices, it's way past fixing individual units
During file prep, leave all gluing-related zones completely blank:
・Glue flap zone: Maintain a continuous, clean, unvarnished paper surface so adhesive contacts paper fibers directly
・Gripper margin: Check with your printer and box style workflow to see if ink, varnish, lamination, or foil stamping must be backed off
・Spot UV plate: Keep spot treatments off glue flaps and bonding margins, especially on packaging with solid background colors and spot varnish
・Lamination bounds: If film lamination crosses glue zones, verify in advance whether you need knocking out, film stripping, or specialized glue
How to Audit Your File Before Printing to Avoid Pitfalls
The MINDS three-step pre-press check works as a direct packaging dieline checklist: 1. Structure: verify how the box folds; 2. Material: check thickness deductions; 3. Finishing: confirm where glue flaps and grippers need ink clearance
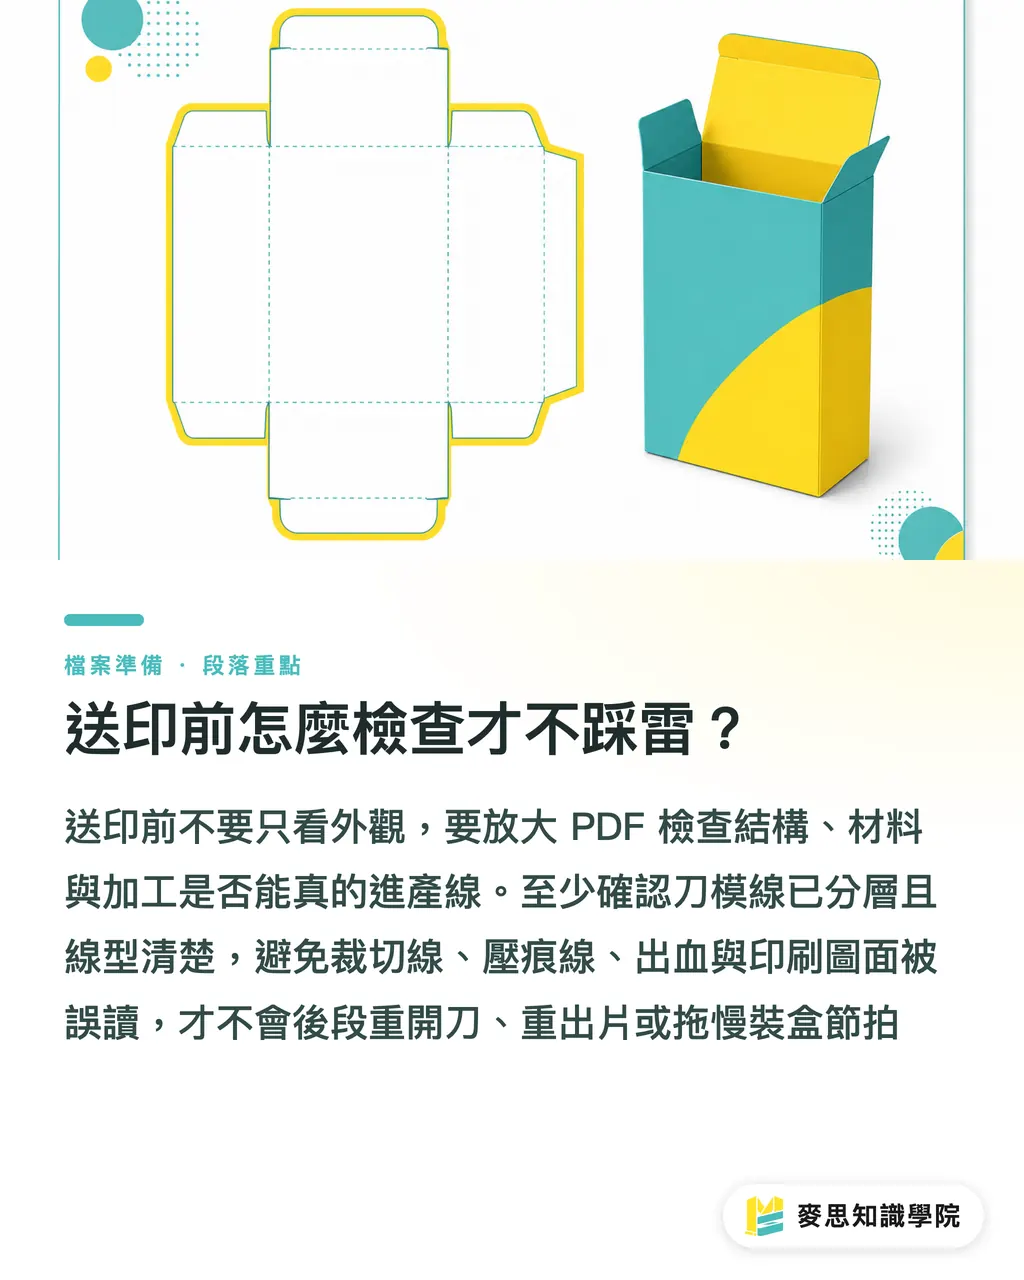
Before sending files to press, don't just stare at the pretty artwork. Zoom in on the PDF to inspect structure. If buyers, designers, and printers only check visual appearances on screen, any fix caught after die tooling, die-cutting, and box gluing hit production will mean remaking dies, re-running plates, or re-sampling
I recommend checking at least six things:
・Dieline layering: Separate cut lines, score lines, bleed, and artwork instead of dumping them all into one layer
・Line styles: Use solid lines for cuts and dashed lines for scores or folds to prevent dieline makers from misinterpreting them
・Clear dimension bases: Specify inner dimensions, outer dimensions, and flat sheet layout sizes so buyers and designers speak the same language
・Actual paper thickness: Don't substitute gsm for thickness. Measure caliper on heavy stock, specialty papers, and mounted boards
・Glue flap knockouts: Keep ink, varnish, film, and spot treatments off adhesive bonding surfaces
・Physical folding test: Digital flat proofs only check colors and layout. You must fold, tuck, glue, and insert real contents into a structural sample
If your packaging project goes onto an automated cartoning machine, pay extra attention to suction cup pickup zones, folding sequence, and closure placement. A great-looking box that jams automated equipment slows down line speeds, and that cost usually runs way higher than reprinting a few sample proofs
Key Takeaways
・Carton assembly jams rarely start on the finishing line. They usually stem from dielines that failed to leave room for paper thickness and folding order
・Separate cut lines and score lines into clear structural categories. Messy line styles leave decisions up to finishing operators to gamble on
・Calculate thickness deductions using measured caliper values. gsm describes weight, not folded space
・Keep glue flaps and gripper margins free of ink and coatings. Adhesive needs raw paper fibers for reliable bonding
・Audit packaging files through three checks (structure, material, and finishing) before print approval. Don't settle for a pretty layout proof
Final Thoughts
For print manufacturers, dieline prep rules ought to be standard preflight checks rather than manual reminders from pre-press operators. For design and SaaS teams, cut lines, score lines, paper caliper, glue clearance, and gripper margins can be turned into automated upload validation fields that flag risks as soon as a PDF enters the system. AI applications can compare layer names, detect varnish objects over glue zones, or highlight missing thickness deductions, but you still need real paper samples to measure, fold, and glue by hand. Packaging is something handled by real hands, grabbed by machine suction cups, and stacked high in warehouses
FAQ
- What is the most common reason folding cartons jam during assembly?
- Folding carton jams usually stem from failing to check score positions, paper thickness deductions, tuck flap dimensions, and glue flap clearance together. The extra thickness created when paper folds makes corners or closures jam against each other
- What is the difference between solid and dashed dielines?
- Solid dielines usually represent cut lines where the paper is sliced through. Dashed dielines usually represent score or fold lines where paper gets creased without cutting. During file prep, separate these two line types by layer or mark them using spot colors
- Can you calculate paper thickness deductions using paper weight?
- No. Paper weight (gsm) measures mass, not thickness. Packaging dielines require actual caliper measurements in mm, adjusted according to the box style and number of folded layers
- Why shouldn't glue flaps be printed with solid color?
- If a glue flap is covered in ink, varnish, film lamination, or spot treatments, adhesive tries to bond over that top layer, leading to weak adhesion. Keeping glue flaps clean down to raw paper lowers the risk of popping glue or mold
- Is physical prototyping mandatory before printing packaging boxes?
- Whenever your box involves new carton styles, heavy stock, specialty papers, varnishes, lamination, or automated cartoning machines, making a structural sample is highly recommended. Test it by folding, tucking, gluing, and inserting actual products. Flat proofs only show layout; physical structural samples reveal whether thickness deductions or glue flaps will fail
Related articles



The Print × AI weekly
The print and AI know-how designers, brands and enterprises can use before they commit — one email, every week
MINDS Free Tools
Spine width and imposition calculators — skip the manual math, free in your browser.
MINDS Group
Need actual printing or gifting services?
From premium printing to online ordering and festive gifts — the MINDS Group sister brands take it from here.